Hey there, welcome back to my little corner of the internet—glad you stopped by! As someone who’s been in the louver game for over a decade, I’ve lost count of how many times clients come to me panicking because their aluminum louvers are acting up. They’re either stuck shut, have weird white streaks on them, or look way duller than when we first installed them. Let me guess—you thought “aluminum is indestructible, right?” Spoiler: it’s pretty tough, but it does need a little TLC to keep doing its job, whether that’s keeping rain out of your warehouse, ventilating your office, or sprucing up your home’s exterior. I see so many people skip the simple maintenance steps and end up having to replace them way sooner than they need to. Today, I’m breaking down exactly how to keep your aluminum louvers looking good and working like new—no fancy tools or expensive products required. Let’s dive in. Louvers
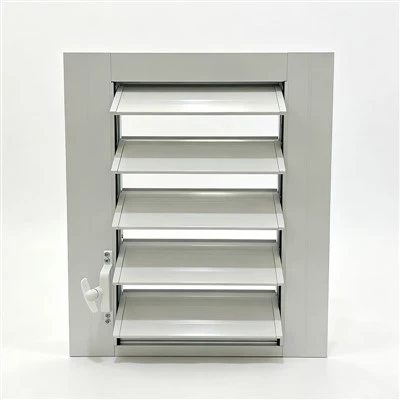
First off, let’s get one thing straight: aluminum louvers are designed to be low-maintenance, way more than wood or steel, but that doesn’t mean you can set ’em and forget ’em. I always tell my clients, “The best maintenance is the kind you do before a problem starts.” Like, checking in once a month is way easier than fixing a rusted hinge or removing a stubborn stain later. Let’s start with the basics—cleaning, because that’s the thing that trips most people up. You might think, “Just spray ’em with the hose and call it a day” but if you do that wrong, you could actually damage the finish.
Wait, what’s the finish on aluminum louvers anyway? Most of the ones we supply are either powder-coated, anodized, or natural bare aluminum. Each needs a slightly different approach, and I’ve seen so many folks mix these up. For powder-coated louvers (the most popular type these days—they’re durable and come in every color under the sun), you don’t need anything harsh. Grab a bucket of warm water, a little mild dish soap (the kind you use for dishes, not the heavy-duty degreaser), and a soft brush or microfiber cloth. Don’t use steel wool or rough scouring pads—they’ll scratch the powder coat, and scratches lead to dirt getting stuck, which leads to dullness, and eventually, could let moisture in if it’s a coastal area.
If you’re dealing with anodized louvers, those are the ones with that slightly matte, uniform finish, common in industrial settings. They’re a bit more resistant to stains, but still, no bleach or ammonia—those will eat away at the anodized layer over time. Same soap and water works here too, but if you’ve got hard water spots (super annoying on exterior louvers), a little white vinegar mixed with water (1 part vinegar, 10 parts water) will lift those right off. Just rinse it thoroughly after so it doesn’t leave a vinegar smell (though it does evaporate fast, so no biggie).
And for natural bare aluminum? Yeah, some people love that industrial, raw look. But that stuff can oxidize—turning that shiny silver into a dull gray, and if you leave it, it might get a little powdery. For that, you’ll need a gentle aluminum polish (not car wax with abrasives) every 6 months or so. Once it’s polished, a thin coat of clear wax will help keep oxidation at bay. Pro tip: never pressure wash aluminum louvers—no matter what kind of finish they have. I’ve had clients who pressure washed their roof and oversprayed the louvers, and the high pressure can bend the louver blades, break hinges, or force water into gaps it shouldn’t go. If you need to get crud off (like bird droppings or tree sap that’s been sitting a while), a soft brush and a little elbow grease is way safer. Speaking of tree sap—don’t let that sit for more than a week. Sap is sticky and can attract dirt, and if it’s left in the sun, it’s almost impossible to get off without scratching. I’ve found that rubbing a little peanut butter (yes, peanut butter!) on sap spots works like a charm—just wipe it off with a damp cloth after a minute. The oils break down the sap, and it’s way cheaper than a specialty cleaner.
Next up, the mechanical parts—those are the ones that actually make the louvers open and close, and they’re the most likely to cause problems. Stuck louvers are my least favorite to hear about, because 9 times out of 10, it’s a super simple fix. Let’s start with hinges: outdoor hinges get exposed to rain, dirt, pollen, and even road salt if you’re near the coast or a highway. Every 3 months (or more often if you live in a dusty area), take a look at each hinge. Wipe off any gunk with a dry cloth, then apply a little silicone-based lubricant—NOT WD-40. Wait, I know WD-40 is a go-to for everyone, but it’s a short-term fix. It evaporates in a month or two, and it can actually attract more dirt over time, making the problem worse. Silicone spray is long-lasting, doesn’t gum up, and won’t damage any metal or plastic parts. Just a quick spritz on each hinge, open and close the louvers a few times to work it in, and you’re good to go.
Then there’s the operating mechanism—those rods, gears, or crank systems (depending on if yours is manual or motorized). For manual louvers, check the crank or push rod every month. Make sure there’s no dirt built up around the pivot points. If it’s getting stiff, add a tiny bit of silicone lube (again, not WD-40) to the moving parts. For motorized louvers? Yep, those need a little love too. Every 6 months, give the motor housing a quick wipe with a dry cloth to keep dust out of the vents, and test the opening/closing cycle a couple of times to make sure it’s running smooth. If you notice it’s making weird noises or taking longer than usual to open, don’t wait until it’s stuck—shoot me a message, or a local handyman can take a look, but most of the time it’s just a little lubrication that’s needed.
One big thing I see all the time, especially in places with extreme weather: debris buildup. Leaves, pine needles, dirt, even bird nests can get caught in the gaps between the louver blades, or at the bottom track. That debris can hold moisture, leading to rust on metal parts, or even blocking the louvers so they can’t open fully. Once a quarter, take a soft brush (like a paintbrush, the old one you don’t use for paint anymore) and gently sweep out any gunk from the gaps and tracks. If it’s a wet area, like near a swimming pool or a rainy climate, do this every two weeks—pool chemicals and rainwater can mix with dirt and make a gross sludge that’s hard to get out if you let it sit. I had a client a few years ago who had louvers above his pool, and he never cleaned the track—by the time he called me, there was a whole layer of calcium build-up, and the track was so clogged the louvers wouldn’t close at all. We had to take them apart, clean each track individually, and re-lubricate, which cost him way more than if he’d just done a quick sweep once a month. Don’t be that guy.
Now, what about specific weather conditions? Because if you live in a coastal area, or a snowy place, or somewhere super dusty, your maintenance routine is gonna change a little. Coastal areas—salt air is brutal. It’s not just the salt on roads; salt in the air corrodes metal parts over time. For coastal clients, I recommend wiping down the entire louver set once a month, not just the hinges. And every 6 months, apply a thin coat of automotive wax to the powder-coated or anodized finish to create a barrier against salt. If you have bare aluminum, you might need to polish it every 3 months instead of 6. Snowy climates: snow and ice can weigh down the louver blades, or get stuck in the tracks. After a big snowstorm, gently brush off any snow from the louvers before it melts and freezes. Never use a metal shovel or ice pick—you’ll bend the blades. A soft plastic snow brush works great, or even a broom with soft bristles. If ice does build up, use a little warm water (not boiling—boiling can crack plastic parts) to melt it, or wait for it to melt on its own, just make sure the track doesn’t stay frozen shut. Super dusty areas, like deserts or construction zones: you’ll need to clean the louvers every 2 weeks, because all that fine dust gets into the gaps and tracks, and can scratch the finish if you leave it. Same goes for areas with a lot of pollen in the spring—pollen gets sticky when wet, so wipe it off before it rains.
Wait, what about common mistakes people make? Let’s talk about those, because I see these all the time. First, using harsh cleaners like bleach, ammonia, or oven cleaner. I had a client once who used oven cleaner to get rid of a grease stain on his kitchen louvers—turns out, it ate right through the powder coat, and he had to replace the whole set. Oven cleaner is super alkaline, and even if you rinse it off right away, it can leave a residue that dulls the finish over time. Stick to mild soap and water, or the stuff I mentioned earlier for specific finishes. Second, bending the louver blades. A lot of people lean on them when cleaning, or bump them with a ladder, and a bent blade not only looks bad, but it throws off the function—air can’t flow right, rain can get in. If a blade does get bent, don’t try to yank it straight with pliers—you’ll crack the finish or break the hinge. Use a pair of soft-jawed pliers (or even just your hands, if it’s a small bend) to gently bend it back into shape. If it’s a big bend, give me a call, we can help you fix it or replace just the blade, not the whole set. Third, ignoring small problems. If you notice a hinge is squeaking, or a blade is stuck, don’t wait 6 months to fix it. That squeak is a sign that the hinge is dry, and adding lubricant now will prevent it from breaking later. A stuck blade might just have a little debris in the track, so a quick clean will fix it, but if you ignore it, the whole operating mechanism can get damaged.
And one last thing—inspections. Once a year, do a full inspection of your louvers. Check every blade for scratches or dents, check all hinges for tightness (if a hinge is loose, tighten the screw with a screwdriver—easy fix), test the operating mechanism to make sure it opens and closes all the way, and check the finish for any signs of wear. If you see a small scratch on the powder coat, you can touch it up with a matching touch-up paint (we sell these for all the louvers we supply, by the way) to prevent moisture from getting under and causing rust. That’s a way cheaper fix than replacing a whole louver panel.
At the end of the day, maintaining aluminum louvers isn’t rocket science. It’s just a few simple, quick steps done regularly that keep them working for 15, 20, even 30 years. I’ve seen louvers last way longer than that when the owner takes 10 minutes a month to check in on them. Skipping maintenance might save you 10 minutes now, but it’ll cost you hours (and a ton of money) later when you have to replace them.

If you’re reading this and realizing you haven’t checked your louvers in a while, don’t stress—grab that cloth and mild soap and start today. And if you’re in the market for new louvers, or need touch-up paint, or help fixing any issues you’ve got, feel free to reach out to us for a chat. We’re here to help, not just sell you product.
Architectural Aluminum Louvers References:
- Aluminum Association. (2021). Guide to Finishing and Maintaining Aluminum Extrusions.
- National Fenestration Rating Council. (2020). Maintenance Best Practices for Exterior Louvers and Sun Control Products.
- American Architectural Manufacturers Association. (2019). Performance and Care of Aluminum Louvers for Commercial and Residential Applications.
Renqiu Zhongsheng Metal Products Co., Ltd.
Renqiu Zhongsheng Metal Products Co., Ltd. is one of the most professional louvers manufacturers and suppliers in China, featured by quality products and low price. Welcome to wholesale advanced louvers made in China here and get pricelist from our factory. Customized orders are welcome.
Address: Liuzhuang Village, Xinzhongyi Town, Renqiu City, Cangzhou City, Hebei Province
E-mail: info@zsaluminum-china.com
WebSite: https://www.zsaluminum-china.com/
